Creating Setup and Deployment Projects in VS.NET
Section 1: Introduction
This step-by-step tutorial guides you how to create a setup and deployment project using Visual Studio .NET to build a setup of your applications. Before creating Setup we should have answer for these questions
1. Why?
If we automate the installation instead of manual installation I can assure that 30-40% of post-installation issues can be reduced.
2. Deployment Plans?
There are many topics that have to be thought about before releasing a plan for process of installation. Some of the critical questions to these issues are as follows:Q:
- a) What do you want to deploy? Is it a Web application files setup, Client Desktop Setup or a Database installation?
- b) What are the pre-installation Harware configuration i.e processor settings,RAM, disk space etc; Software packages i.e MS Office, SQL Server Enterprise edition, etc that are mandatory for you to setup?
- c) Which are the physical paths for your custom files, system files, Database (.dat, mdf etc), configuration files, read-write files? This is critical today since for us to be Windows 2003 compliant there are certain rules that have to be followed in this regard.Q:
- d) What do you want to configure post-installation? These may include things like configuring database connection string in your Web.config files;
Section 2:Project Types
There are five types of setup and deployment projects in VS.NET, but three are of significant importance that are “SetUp Project”, “Web Setup Project” and “Merge Module Project”.

- Setup Project - Generic type of project that could be used for all type of applications including web based application.
- Web SetUp Project - Name suggests the type; this project type helps in creating virtual directories for web based applications during installation.
- Merge Module Project - When you want to install some additional third party software like MSDE along with your application then you can use this type of project. Use a *.msm extension based merge module installation of MSDE along with your own and create a setup.
Get Started
1) Select a SetUp Project type as shown in Display 1.
2) The default File System editor will appear in the window as shown in Display 2
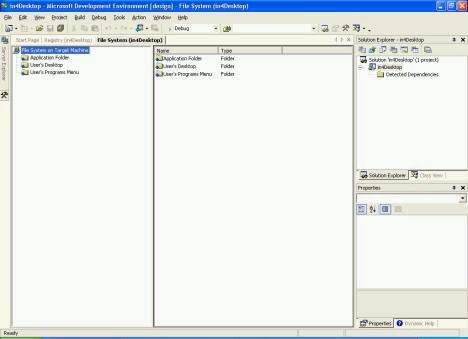 3) One can add special folders here into which they intend to add files. Just right click on the editor to view the special folder types available. These are the folders into which you can drag and drop an entire folder structure with files.
4) Click on Registry editor and navigate to that editor (Display 3). One can configure registry settings here like “Manufacturer’s name”, “Version No”, etc.
5) There is also Launch Conditions editor available. This is of greatest use since one can pre-validate for certain rules even before installation.

6) File types editor is used to associate a default command action, File description , icon and extension for your custom files. There are many occasions we create new file-types with extensions like “.rmt” or “.cpg” etc.
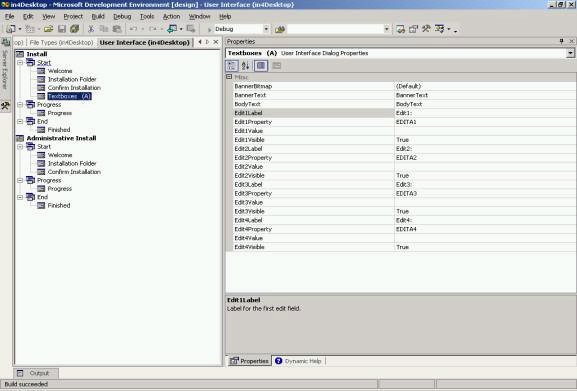
7) User Interface editor is provided in VS.Net by default with certain additional dialogs as per the requirements (refer display 9). Add for e.g. Textboxes (A) option that provides you with 4 textbox with edit value, label and property.This is the most important editor since this is the UI that interfaces between the user and your MSI setup. The values captured from here are used throughout the installer like in Custom actions.
8) Custom actions editor is where one adds some custom built *.exe, *.bat, *.wsh and other script files. As an example I have added a new C# windows application project as in Display 11. The following code in display that has a “Messagebox.Show” for a command line argument received. This could very well be any other functionality instead of Messsagebox.
9) Installer setup is now complete. Build the project and try to install.
Though I have not been able to discuss complete technical features of VS.NET to create MSI, the features discussed in this article with some individual reading are very much sufficient to create a professional MSI installer.Happy Programming!
Check Deployment Properties, Custom Actions in MSDN.
posted by Prem at
2:55 PM
![]()

0 Comments:
Post a Comment
<< Home